TOTAL VISITS

Tuesday 28 April 2015

How Has Google's Mobile Friendly Update Affected Websites?


Mobilegeddon


Last week, Google started rolling out a new mobile friendly update to its mobile search algorithm. This was aimed at significantly changing the mobile search results to give preference to mobile ready web sites over non mobile ready ones. Experts jokingly termed it 'Mobilegeddon', because all signs indicated that it is a major change in many years, and will significantly impact websites. But a week after the launch, has it really been such a significant update?


Thus far, the algorithm doesn't seem to have had as big of an impact as we expected.


Google confirmed in the Webmaster Central blog that the roll out began on Tuesday, April 21st. Some experts started seeing a difference as early as the 22nd. Some websites such as SEJ even published a list of top winners and losers from this mobile friendly update.


Mobilegeddon


However, in many cases, these changes were merely slight disturbances, and not very significant shifts. Several SEO metric companies such as Searchmetrics are tracking the update and for the most part, they are not seeing huge shifts in the Google mobile ranking algorithm just yet.


This is not to say that websites haven't been affected. Quite the contrary. Some websites certainly seem to be losing and some taking advantage. But compared to overall search volume for major keywords, the change isn't huge. However, Google has said that the roll out can last a week more yet. So maybe we just need to wait a little longer.


According to Moz, "so far, the big day was April 22nd, and it wasn't that big." Peter Meyers from Moz has been tracking mobile search results rankings for a set of top keywords, and according to him, the punch of the update hasn't fallen, not as yet anyway.


MozCast
Credits: Moz Blog


Some experts reckon that Mobilegeddon is here. According to Searchmetrics, 'visible trends can be seen in the new data'. But for the most part, the webmaster community hasn�t been too impressed with the level of significance in the mobile results. Ryan Heuser from seoClarity noted a variance of only 5.1% in Google mobile search results.


This means that most are not noticing significant changes to the mobile search rankings yet. Again, that might change over the course of the next week. With that said, there is still time to make your site mobile friend. Follow the article below to get started on that.


Good luck :)

Saturday 25 April 2015

Major WordPress Plugins Making Websites Vulnerable


Vulnerable WordPress Plugins


Are you using WordPress to run one of your websites? If yes, then you need to read through. According to a latest warning by a security company, a number of WordPress plugins are vulnerable to a security flaw, which could compromise your website and leave it open for malicious attacks. These are some of the major plugins that you are likely to have installed on your websites. If so, then immediate action is required!


The warning was issued by WordPress Security watchdogs Sucuri. According to them, this is a major security flaw that is shared by many WordPress plugins, some of which are quite popular. According to them;


�Cross-site Scripting (XSS) due to the misuse of the add_query_arg() and remove_query_arg() functions. These are popular functions used by developers to modify and add query strings to URLs within WordPress.�


Apparently, the problem was that the official WordPress Official Documentation for these functions was not very clear, which led to many plugin developers using them in an insecure way.


To date, this is the list of affected plugins:


  • Jetpack

  • WordPress SEO

  • Google Analytics by Yoast

  • All In one SEO

  • Gravity Forms

  • Multiple Plugins from Easy Digital Downloads

  • UpdraftPlus

  • WP-E-Commerce

  • WPTouch

  • Download Monitor

  • Related Posts for WordPress

  • My Calendar

  • P3 Profiler

  • Give

  • Multiple iThemes products including Builder and Exchange

  • Broken-Link-Checker

  • Ninja Forms


As you can see, some of these plugins are very popular and used by millions of websites. If you use any of the above plugins, it�s recommended that you update them immediately.


This vulnerability was initially discovered last week, which has allowed for time for the flaws to be patched. Sucuri reports that all plugins have been patched, and as of this morning updates should be available to all users.


As an additional caution, plugins beyond what�s listed above may be vulnerable to the same security flaw, and have just not been detected yet. With that in mind, it�s best to keep all of your plugins updated just in case.


Stay safe :)


Tuesday 21 April 2015

How To Optimize Content For Google's Mobile Algorithm Update?


Google's mobile algorithm update


What is the biggest algorithm update Google has made over the last decade? For most of us, Google Panda and Penguin immediately spring to mind. Right? Wrong! The biggest and most notable change Google has made over the last few years happened, or at least started today. Unofficially dubbed as "Mobilegeddon", this new April 21 update is focused towards promoting mobile-friendly sites in search results, effectively turning the tables for various businesses, large and small.


This new update promises to be a game changer. It will rank mobile-friendly sites higher than non-mobile-friendly ones. Many webmasters from around the world are anxious about its release since it could significantly impact traffic, and could mean an entire reworking of site architecture and the content contained therein.


Today, we'll look at what this update means for your content, and how can you adapt your content to meet the requirements of this new algorithm update. There is going to be a series of changes that you should aim to heed if you intend to keep producing high-quality, compelling content after the update has completely rolled out.


1. Headline length


User experience on a mobile device is different than a desktop browser. One of the most obvious differences is the change in screen size (and the amount of usable real estate). Currently, a headline can stretch across the full banner-length of a browser, but mobile screens change the game when it comes to headline width.


Create shorter headlines. For Twitter users, it just means that you can practice your 140-character limit more often. For those of us who don�t use this particular social media network, now is a good time to start. We need to learn how to condense page-width headlines into more bite-sized chunks, without sacrificing the impact potential of our headline.


2. Create short paragraphs


�Snackable content� is something that content producers are all too aware of, but is especially important for mobile optimization. Create content that the user can consume in one sitting. However, the format in which we present this content is likely to be as bite-sized as the content itself. Because of short attention spans and aversions to �walls of text� it�s likely that mobile users would feel put upon when it comes to dealing with paragraphs that fill their entire screen.


What this Means for Us: Learn to summarize your ideas. Keep to the point and make your copy more targeted in nature. In some cases, such as home pages, reduce the amount of copy there altogether. Increased copy gives the user a hard time and makes for difficult reading, especially on a tiny display. Get your message across in short bursts.


3. Keeping it relevant


This mobile update is likely to make content producers do the same, paring content down to be less wordy while at the same time interspersing calls to action. Condensing content will require us to consider what we write and distill the message in as few words as possible.


What this Means for Us: Rethink the methodology for creating content. In addition to making content compelling and benefit focused, we must also now take a look at the amount of words we use and how often we call to action. It could possibly mean a change in the basic tenets of web writing.


The exclusion is blog content� they will always rank and read better in long form � but for your home and main pages, less content means a better mobile experience, and happier readers.


You may need to review web writing and revamp some marketing approaches accordingly to align to with what is expected from mobile friendly sites.

Saturday 18 April 2015

Syntax Highlighter Shortcode For Blogger Blogs!

SyntaxHighlighter Shortcode for Blogger

SyntaxHighlighter as you know is a fully functional self-contained code syntax highlighter developed in JavaScript. Which helps you prettify your Code format and display it in an organized numbered list style. Most Blogspot users often share HTML, CSS or JavaScript codes with their audience using Blockquotes but with this new shortcode you can better display scripts on your sites in a presentable way. This plugin neatly displays web technologies such as HTML, CSS, JavaScript, Php, Python, Sql, xml etc. The codes are displayed line by line number wise. It also provides the user with options to Print the code, copy it to clip board or to see the code Source. With SyntaxHighlighter Shortcode you can add codes not only inside your posts or sidebar widgets but you can also insert it inside Blogger comments!


add SyntaxHighlighter in comments

This new shortcode will be a revolution in the way bloggers share codes on their sites. Lets first see it in action!


1. Install Blogger Shortcode Plugin

In order to use SyntaxHighlighter shortcode you must first install the shortcode plugin for your blogger blog by following 7 easy steps shared on the link below:

Skip installing it if you have already added it in your blogger template

2. Add SyntaxHighlighter  Brushes and Styles

Brushes defines the formatting for the programming language you would use. The plugin shows different styles and formats the code differently for the type of script you use. Each code type comes with a script called Brush. I have used the most popular brushes but if you wish to use a brush of your choice then you can select one from this Brush list.

1 Go To Blogger > Template > Backup your Template

2 Click Edit HTML

3 Paste the code below just above </head>

<!--SYNTAX HIGHLIGHTER BY MBT STARTS-->
<link href='http://alexgorbatchev.com/pub/sh/2.1.382/styles/shCore.css' rel='stylesheet' type='text/css'/>
<link href='http://alexgorbatchev.com/pub/sh/2.1.382/styles/shThemeDefault.css' rel='stylesheet' type='text/css'/>
<script src='http://alexgorbatchev.com/pub/sh/2.1.382/scripts/shCore.js' type='text/javascript'/>
<script src='http://alexgorbatchev.com/pub/sh/2.1.382/scripts/shBrushCpp.js' type='text/javascript'/>
<script src='http://alexgorbatchev.com/pub/sh/2.1.382/scripts/shBrushCSharp.js' type='text/javascript'/>
<script src='http://alexgorbatchev.com/pub/sh/2.1.382/scripts/shBrushCss.js' type='text/javascript'/>
<script src='http://alexgorbatchev.com/pub/sh/2.1.382/scripts/shBrushJScript.js' type='text/javascript'/>
<script src='http://alexgorbatchev.com/pub/sh/2.1.382/scripts/shBrushPhp.js' type='text/javascript'/>
<script src='http://alexgorbatchev.com/pub/sh/2.1.382/scripts/shBrushPython.js' type='text/javascript'/>
<script src='http://alexgorbatchev.com/pub/sh/2.1.382/scripts/shBrushRuby.js' type='text/javascript'/>
<script src='http://alexgorbatchev.com/pub/sh/2.1.382/scripts/shBrushSql.js' type='text/javascript'/>
<script src='http://alexgorbatchev.com/pub/sh/2.1.382/scripts/shBrushVb.js' type='text/javascript'/>
<script src='http://alexgorbatchev.com/pub/sh/2.1.382/scripts/shBrushXml.js' type='text/javascript'/>
<script src='http://alexgorbatchev.com/pub/sh/2.1.382/scripts/shBrushPerl.js' type='text/javascript'/>
<script language='javascript'>
SyntaxHighlighter.config.bloggerMode = true;
SyntaxHighlighter.config.clipboardSwf = &#39;http://alexgorbatchev.com/pub/sh/2.1.382/scripts/clipboard.swf&#39;;
SyntaxHighlighter.all();
</script>
<!--SYNTAX HIGHLIGHTER BY MBT ENDS-->

4 Save your template and you are all done with the coding part!

Customization:

The above code will create the default White theme as shown in demo but if you want to use a dark theme or anyone of the 6 themes available then you just need to replace the yellow highlighted code above with the style sheet link of your preferred theme. Lets suppose you liked the "Fade to Grey theme" , then you will simply replace the yellow highlighted code with this code instead:

<link href='http://alexgorbatchev.com/pub/sh/current/styles/shThemeFadeToGrey.css' rel='stylesheet' type='text/css'/>

Output:

fadeTogrey Theme SyntaxHighlighter

For more such themes read this post

3. Finally Start Adding The SyntaxHighlighter Shortcode!

Now whenever you wish to add code inside your posts. comments or sidebar widgets, follow these steps

1. First Encode your Code using our HTML Encoder Tool

2. Next simply use the shortcode below to display the syntax highlighter on your blog

[code]Add Your Encoded Code Here[/code]

3. If you wish to highlight a certain row in your code then you can specify the row number with the "hl" attribute as shown below. Lets highlight row 1, 4 and 7.

Tip: Separate row numbers with comma. If you want to highlight a single row i.e. row 9 then simply type hl="9"

[code hl="1, 4, 7"]Add Your Encoded Code Here[/code]

Output:

highlight rows in SyntaxHighlighter


Need Help?

Let me know if you need any help here. I hope the shortcode above simplifies code sharing on your blog and makes it easy for you to highlight Code Syntax in a much professional way using just a simple shortcode without adding any complex long HTML.

Peace and blessings buddies! =)

Thursday 16 April 2015

YouTube Shortcode For Blogger Blogs!

youtube shortcode plugin

After having developed shortcodes for SoundCloud and Dailymotion, it is now time to start embedding YouTube Video Player and YouTube Playlists anywhere you want. The shortcode for YouTube player lets you insert the player inside your Posts, Widgets and even the threaded comments with a single line of code. The method is extremely easy and lets you add the responsive version YouTube video Player which adjusts automatically to any screen size. You can now easily share MP4 or HD videos with your readers from YouTube with an extremely easy way. Lets see its demo in action!

Note: If YouTube is banned in your country try viewing the demo by installing this tool.

There are some old techniques which lets you embed YouTube videos in blogger comments but the method we are sharing today gives you an extra benefit. It lets you add a light-weight shortcode  which can be inserted almost anywhere not just the comment sections. You can treat it as a simple TEXT which can be pasted on any location of your template structure. It also gives you full control over your player or playlist thanks to the attributes which you can configure to turn ON or OFF the Player options. So it has a lot more to offer than any method shared earlier!


1. Install Blogger Shortcode Plugin

In order to use YouTube shortcode you must first install the shortcode plugin for your blogger blog by following 7 easy steps shared on the link below:

Skip installing it if you have already added it in your blogger template

2. How To create the YouTube Shortcode?

First select a video from Youtube and then copy its Video ID which is a 11 Characters pattern that is added at the end of every YouTube Page URL, as shown below

Video ID of youTube

In our example the Video ID is Qy4yULSqBA0.

Next use the shortcode below to insert your Player anywhere on your blog

[youtube src="Qy4yULSqBA0"/]

Replace the Video ID inside src with yours.

Output:

youtube shortcode output

That simple!

Create a YouTube Playlist Shortcode

This time find your favorite playlist on Youtube and copy the Video ID and Playlist ID from the URL in your address bar as shown below

finding youtube Playlist ID

Then use the shortcode below to embed your playlist on your web blog

[youtube src="-L-GOHa5-YQ" playlist="PL332F98D63FD60CB6"/]

The Video ID is inserted inside "src" and Playlist ID is inserted inside "playlist"

Output:

playlist shortcode

Customize your Player!

Find below the complete list attributes supported by the shortcode

Attribute Definition
src Insert Video ID here
playlist Insert Playlist ID here
width Adjusts width of video player. Can also be assigned in percentage for responsiveness.
height Adjusts height of video player
info Setting it to "0" will hide the video title and player actions. By default it is set to "1"
control Setting it to "0" will hide the player controls like the play/pause buttons, settings, streamer and Volume options. By default it is set to "1"
related Setting it to "1" will show suggested videos when the video finishes. By default it is set to false i.e. "0"

Use the format below to insert attributes inside shortcode. In the video below I am turning OFF the controls, Video title and turning ON showing related videos when video ends. I am also re-sizing the video using custom width and height.


[youtube src="z2_2cFityc4" control="0" info="0" related="1" width="450" height="350"/]

Output:

customize youtube player

Wasn't that easy!

Need Help?

I hope this new shortcode helps you embed videos on your blog with much more ease and comfort. Let us know if you need any help if needed. There is a lot more to come which will change your blogging experience forever. Stay tuned!

Peace and blessings buddies! =d

Wednesday 15 April 2015

Create CSS3 Notification Boxes in Blogger using "Shortcodes"

Notification Boxes Shortcode

Notification boxes or Alert Boxes or Messages boxes are a great way to inform the user of a variety of messages, such as: alert, update, announcement, error, success, warning etc. and general info notification. You can use. The good news is that we have developed Shortcodes for Blogger Notification Boxes which helps you insert a Responsive Message box anywhere on your blog with a single line of code. We have also used the fontawesome icons which gives a more lively touch to the boxes. Just give your box a title and message and you are all set to prompt your users of important announcements! The Boxes are fluid and responsive and auto adjusts to any screen size. Each box has a different color and can be given any title, not necessarily the five default titles we have shown in the demo page below.


In this tutorial, we are going to create most popular notification boxes using shortcodes for the following:

  1. Warning or Error Box
  2. Success Box
  3. Information Box
  4. Alert Box
  5. Update box or Announcement box

1. Install Blogger Shortcode Plugin

In order to use notification boxes you must first install the shortcode plugin for your blogger blog by following 7 easy steps shared on the link below:

Skip installing it if you have already added it in your blogger template

2. Add Styles for Appearance

First we will add the CSS styles to your template. For this following the steps below:

1 Go To Blogger > Template > Backup your template

2 Click Edit HTML

3 Search for ]]></b:skin>

4 Paste the following CSS code just above it

/*---- Shortcode Notification Boxes ---*/
.sc-notification{color:#fff;line-height:1.4em;margin:10px 0 1em;padding:.7em 1.2em;background-color:#ffffe0;border:1px solid #e1db8b;font-size:15px;font-family:helvetica;text-shadow:1px 0 6px #333;box-shadow:2px 3px 6px #D7D7D7}.sc-notification .headline{font-size:17px;font-family:oswald,arial;padding-bottom:10px}.sc-notification.sc-warning{background-color:#fc402c;border:1px solid #C91704}.sc-notification.sc-alert{background-color:#FF8377;border:1px solid #F15C4C}.sc-success.sc-notification{background-color:#2ec23e;border:1px solid #039D14}.sc-info.sc-notification{background-color:#fdce09;border:1px solid #DFB400}.sc-update.sc-notification{background-color:#29b7ff;border:1px solid #069DE9}.sc-info.sc-notification div.headline::before{font-family:FontAwesome;position:relative;content:'\f05a';font-size:20px;padding-right:10px}.sc-update.sc-notification div.headline::before{font-family:FontAwesome;position:relative;content:'\f0a1';font-size:20px;padding-right:10px}.sc-alert.sc-notification div.headline::before{font-family:FontAwesome;position:relative;content:'\f06a';font-size:20px;padding-right:10px}.sc-success.sc-notification div.headline::before{font-family:FontAwesome;position:relative;content:'\f058';font-size:20px;padding-right:10px}.sc-warning.sc-notification div.headline::before{font-family:FontAwesome;position:relative;content:'\f071';font-size:20px;padding-right:10px}


5 Save your template and you are all done!

3. Finally Add CSS3 Notification Shortcodes in Blogger

A shortcode is simply a text enclosed inside Square braces which you can add anywhere. Our Plugin then parses these braces into HTML tags. You can choose to add the message boxes inside your Blog posts, Static pages, Sidebar widgets or even inside your blog comments. Just use the shortcodes shared below to make the magic work for itself!

Update Box shortcode

To Create a Update Box use this shortcode:

[update headline="Update"]Add Your Message Here.[/update]

  • Where you can give your box any title or headline by changing the text inside headline attribute with your Title.
  • Replace "Add Your Message Here." with your Custom Message

Alert box shortcode

To Create a Alert Box use this:

[alert headline="Alert!"]Add Your Message Here.[/alert]

info box shortcode

To Create a Info Box use this:

[info headline="Info"]Add Your Message Here.[/info]

Warning box shortcode

To Create a Warning Box use this:

[warning headline="Warning!"]Add Your Message Here.[/warning]

success box shortcode

To Create a Success Box use this:

[success headline="Success"]Add Your Message Here.[/success]

Need Help?

Let me know if you needed any assistance. All we aim is to make your blogging experience even more worth while. Hope these new shortcodes may help you in easing your work load and in adding some colors to your BlogSpot blogs. Peace and blessings buddies :)

Sunday 12 April 2015

Facebook Page Plugin Shortcode For Blogger

Facebook page plugin shortcode

Facebook Like Box plugin is deprecated and will stop working on June 23rd 2015. Facebook has suggested to use the new Page Plugin instead. Therefore we are releasing today the Blogger shortcode for Facebook Page Plugin which lets you easily embed and promote any Facebook Page on your website or blog, your visitors can like and share the Page without having to leave your site. You can also show a simple feed of your Page Posts. You can now embed the Page Plugin inside blog posts, sidebar widgets and even inside blogger comments with just a simple one line code.

1. Install Blogger Shortcode Plugin

First and foremost install the Blogger Shortcode Plugin in order to make this Page Plugin work. Follow these 7 easy steps shared on the tutorial link below.

After you have installed the plugin, you can then follow the steps discussed below to start embedding the FB Plugin on your blog anywhere you want.

2. Add Facebook JavaScript SDK

(Optional Step)

If you have already added Facebook JS SDK code on your templates then you can skip this step else following these steps:

1 Go To Blogger > Template

2 Backup your template

3 Click Edit HTML

4 Paste the following code just below <body>

<div id='fb-root'/>
<script>
//<![CDATA[
(function(d, s, id) {
  var js, fjs = d.getElementsByTagName(s)[0];
  if (d.getElementById(id)) return;
  js = d.createElement(s); js.id = id;
  js.src = "//connect.facebook.net/en_US/sdk.js#xfbml=1&version=v2.3";
  fjs.parentNode.insertBefore(js, fjs);
}(document, 'script', 'facebook-jssdk'));
//]]>
</script>

5 Save your template and you are all done!

3. How to add Facebook Page Plugin Shortcode?

Add the following shortcode anywhere you want to make the Page Plugin display. You can add it almost on any location, may that be your blog composer, HTML/JavaScript widgets or Blog comments.

[facebook src="bloggertricks"/]

Replace bloggertricks with your Fan page username.

Output:

shortcode for facebook page plugin

That's it! =)

Complete List of Supported Attributes

Following are attributes that you can use to configure and customize the settings in shortcode.

Attribute Definition
src Points to Facebook Fanpage username.
width Changes width of the FB iFrame. Minimum allowed width is 280
height Changes height of the Page Plugin. Minimum allowed height is 130
hide-cover Setting it to "true" will hide your Cover photo. By default its value is false
posts Setting it to "true" will display your Page Posts. By default it is set to false.
faces Setting it to "false" will hide your Friend's faces i.e. Profile Display Pictures. By default the value it set to true

For example if you wish to hide the facebook cover, show page posts, and set the width & height of the page plugin then use the attributes in this format

[facebook src="bloggertricks" width="500" height="400" hide-cover="true" posts="true"/]

Output:

custom Page Plugin shortcode

Need help?

I hope this shortcode makes your job easy when it comes to sharing your FB Page on your blog. You can now embed it anywhere with a single line of code and there is no more a need to paste that ugly long Facebook code. Let me know if you needed any further assistance.

Wish you a happy sharing experience. Peace and blessings buddies! :)

Wednesday 8 April 2015

What You Need To Know About Google's New Mobile-Friendly Update?


Google Algorithm Update


According to Google Webmaster Central, Google will be rolling out the most significant mobile algorithm change to date starting April 21. Google already owns the mobile revolution, with Android as the biggest mobile platform, Google Search as the biggest mobile search provider, and Play Store as the largest mobile app store. Google wants to push forward with more control over websites, and hence a 'mobile-friendly' algorithm update is inevitable. Here is what you can expect from the update starting April 21.


This is a significant change


This change will affect mobile searches in all languages worldwide and will have a significant impact in search results. What will be the actual impact of an algo change that is �significant�? It�s anyone�s guess. Already, we know that this update will be bigger than Panda or Penguin. We also know that Google considers mobile to be so significant that they are working to dominate nearly all of its manifestations. With this search update, we should brace ourselves for a major adjustment in the way that mobile search functions.


App indexing is important


App indexing is a new feature of the algorithm that will be exclusive to sites with associated Android apps. And according to Google Webmaster Central:


Starting today, we will begin to use information from indexed apps as a factor in ranking for signed-in users who have the app installed. As a result, we may now surface content from indexed apps more prominently in search.


The purpose of this feature is probably to tighten the connection between mobile search and mobile application. Eventually, there will probably be little distinction between the two. Bridging the gap via search is a logical choice.


Real-time algo


This algorithm will run in real-time, so technically, you can make changes any day, and as soon as Google picks up on the change, the site will start to benefit from the new mobile-friendly algorithm change.


Obviously, Google can only assess a site�s mobile friendliness when it crawls the page and indexes it for search. At this point, your site is scored. If the page is not mobile friendly on April 21, but becomes mobile-friendly on April 25, then we can assume that Google�s next crawl should be able to identify it as such.


Each page assessed individually


A notable feature of the mobile algorithm is that it analyzes mobile compatibility on a page-by-page basis, rather than a website-wide basis. So if your site has some mobile-optimized pages, but some non-optimized ones, then Google will look at them separately and promote the ones that are optimized. They won�t �penalize� an entire site based on the off chance that a few pages aren't optimized.


The exact details of the algo are yet to be confirmed. Let's sit tight and wait for April 21st. What we do know is, Google is leading the way forwards in mobile, and you will have to adopt to it or die in search result pages.


Best of luck :)

SoundCloud Shortcode For Blogger!

Add SoundCloud Shortcode in Blogger

SoundCloud shortcode lets you embed Soundcloud Music Players in your Blogger blogs. Using Blogger shortcode plugin, you can now embed Audio Tracks and playlists hosted at soundcloud anywhere on your blog, you can insert MP3 tracks inside your Blogspot comments, Posts, Pages and HTML/Javascript Widgets. The shortcode is a code in Textual format which can be pasted on any visual editor or composer. You can now add Top-of-the notch Sound Technology in your blogs with just a simple line of code! Our Shortcode Plugin is much more user friendly when compared to Wordpress SoundCloud Shortcode because it supports attributes instead of parameters to keep the shortcode clean and tidy. It is now time to add a new life to your blog and let your visitors hear music when they browse your site!

You can play the following files using the shortcode AIFF, WAVE (WAV), FLAC, ALAC, OGG, MP2, MP3, AAC, AMR, and WMA files. You can now upload sound files as big as 5GB in size to your SoundCloud account and then embed them anywhere on your blog using this unique Plugin.

What Can You Do with SoundCloud Shortcode?

The shortcode for Soundcloud can be nested inside other shortcodes such Accordion or Tabs to make it work just perfectly

nested soundcloud player inside accordion

You can create tracks or even playlists of your favorite singers, musicians or Nasheed reciters. Add the playlist inside your Post composer, Sidebar widgets or even inside your threaded comment form!

soundcloud embedded in Comments

You can create both classic Player (shown below) or the new Visual Player as shown above.

Soundcloud Classic Player

Lets now learn how to add it in blogger by following these three basic steps!

1. Install Blogger Shortcode Plugin

This shortcode will not work unless you have installed the Shortcode Plugin. Follow these 7 easy steps shared on the tutorial link below

After you have installed the plugin, you can then follow the steps discussed below to start embedding Audio Tracks on your blog.

2. Grab Your Track ID or Playlist ID

In order to embed soundcloud player or playlist inside your website you need the track ID and Playlist ID respectively.

Finding the Track ID

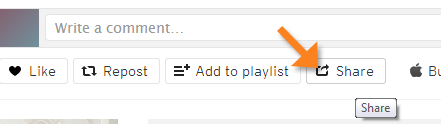
Go to SoundCloud and find a track you like. Click the 'Share' button below the waveform and an overlay will appear.

click the share button

Click the embed tab and copy and paste the code inside a notepad or any editor you may have.

Click embed tab

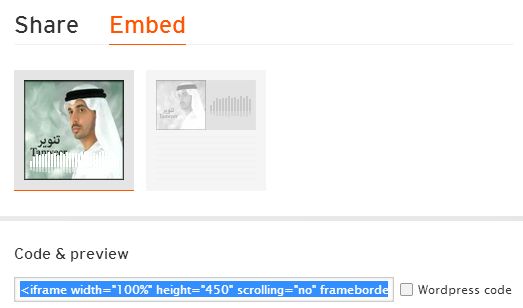
The code inside "Code & Preview" will have the track ID inside it which looks like the one shown below.

api.soundcloud.com/tracks/106634299

In the example case above the Track ID is 106634299. You only need this track ID to make the shortcode work.

Finding the Playlist ID

Now Lets learn how to find the Playlist ID. Visit the profile of your favorite artist or singer. Click the 'Share' Button on the sidebar.

SoundCloud user profile

Click the embed tab and copy the code from "Code & Preview" . Paste the code inside notepad and you will find the Playlist ID inside it as shown below

api.soundcloud.com/users/7518543

In our example the playlist ID is 7518543

3. Adding The SoundCloud Shortcode

After you have installed the plugin and learnt how to grab the track and Playlist IDs, you can then easily embed the player in your blog using the shortcode below.

 [soundcloud src="106634299"/]


Replace the Track ID with yours inside the src attribute


Output:


SoundCloud track


To create a Playlist use this shortcode


[soundcloud height="350" playlist="1" src="7518543"/]


Replace the Playlist ID with yours inside the src attribute.


Note: For creating playlists it is important that you use the height and playlist attributes.


Output:


SoundCloud Playlist


Customize the SoundCloud Player


Following is the complete list of attributes supported by our Shortcode


Attribute Definition
src Insert Track ID or Playlist ID here
color Changes background color of the Player Button in Classic View only.
playlist By default player is displayed for playing a single Track but if you wish to display a Playlist or multiple tracks then you need to insert this attribute with value set to "1" and insert the Playlist ID inside src attribute
auto Setting this attribute to "true" will auto play the track. Setting it to "false" will turn off the auto play mode.
width Changes width of the Player iFrame. Can also be assigned in percentage for responsiveness.
height Changes height of the Player
visual Setting it to "true" will display the "Visual" Player with wide background image. Setting this option to "false" will display the old HTML5 Classic Player.
comments Setting it to "true" will display user comments on the player. Setting it to "false" will turn off displaying user comments
user Setting it to "true" will display the uploader name. Setting it to "false" will hide the uploader name.


Use the attributes in following format


[soundcloud auto="true" user="false" visual="true" comments="true" width="550" height="400" src="106634299"/]


The above shortcode will create a player which will auto play, has Visual look, hides Uploader name, shows comments, and has custom width and height dimensions.


Output:


Custom SoundCloud Track


Need Help?


I hope I have covered every single detail but still If I forget to clarify any point, feel free to post your question below. Do share your precious views and let us know your useful feedback. Shine up your blogs and stay tuned for more such awesome shortcodes because we have promised to take blogger to the next level!


Peace and blessings buddies! =>

Monday 6 April 2015

Dailymotion Shortcode For Blogger!

dailymotion shortcode for bloggerThat day has come when you can embed videos anywhere on your BlogSpot blogs! You can now add or insert dailymotion videos inside blogger comments, posts, static pages and HTML/JavaScript widgets thanks to Blogger Shortcode Plugin that we released few days ago. Add video tracks almost anywhere on your blog with just a simple shortcode. We are creating more video shortcodes in coming days for YouTube, TED Talks, Vimeo etc. Thankfully you no more need to use that long ugly iFrame codes to embed videos inside your content, we have a much cleaner option. Lets see it in action!

Install Blogger Shortcode Plugin

This shortcode will not work unless you have installed the Shortcode Plugin. Follow these 7 easy steps shared on the tutorial link below

After you have installed the plugin, you can then follow the steps discussed below to start embedding videos on your blog.

How To Use Dailymotion Shortcode in Blogger?

First, find a Dailymotion video you would like to use. In your web browser�s address bar, copy the highlighted portion of the video�s URL illustrated below (this is called the video�s ID): You just need to copy this video ID.

dailymotion video ID

In this example the video ID is  x1ezu5y. You just need this Id to make the shortcode work.

Create a new post or page on your blog (or open a draft post or page) and add the following shortcode directly to the visual editor. You can also test it by pasting the following shortcode directly inside the comment form. Replace x1ezu5y video ID with the one you are using.

[dailymotion src="x1ezu5y"/]


After publishing, your video will look exactly like the one shown below:


embed dailymotion in blogger


Want to Customize the Video?


You can add a background color and highlight the text to customize your video by using the following attributes inside the shortcode


Tip: Use our Color Code Generator for finding color ideas.


[dailymotion color="FFC300" highlight="FFC300" background="000000" src="x1ezu5y"/]


Output:


customized dailymotion video


To edit the dimensions of the video IFrame and also hide the title text and dailymotion logo, lets add some more attributes


[dailymotion width="80%" height="350" info="0" logo="0" color="FFC300" highlight="FFC300" background="000000" src="x1ezu5y"/]


Output:


dailymotion video with no in-player info


Always choose a percentage value for width where possible to make the video auto adjust itself on mobile devices.


Complete List of Attributes


Here is the complete list of each attribute definition that can be used with dailymotion shortcode.


Note: All attributes are in lowercase. Blogger shortcodes are all Case Sensitive.


Attribute Definition
src Insert Video ID here
color Changes color of the Video title text and Player icon
highlight Changes color of Title and Player on Mouse hover
background Change the background color of the video
width Adjusts width of video iframe. Can also be assigned in percentage for responsiveness.
height Adjusts height of video iframe
info Hides in-player video info like video Title, uploader's name and time duration. Caption is hidden by default. "0" means Hidden and "1" means Visible
logo Hide's dailymotion logo. "0" means Hidden and "1" means Visible


Need Help?


I hope you may now enjoy adding videos on your blogs to spice it up further and provide a more interesting interface for your visitors. The best thing about shortcodes is that they are treated as TEXT which can be inserted anywhere, be that inside posts, sidebar, template or even the comments. This was surely not possible before. I hope you may like it and find it useful. Do let us know if you need any help or assistance.


Peace and blessings buddies! =>

Sunday 5 April 2015

jQuery "Tabs Shortcode" For Blogger!

Tabs Shortcode for blogger

We have shared several Multi Tabs widget in the past but today we are sharing the shortcode for creating responsive tabs inside blogger posts, sidebars and comments. This new method will help you add shortcodes anywhere on your blog with a single line of code. You can add multiple Tabs widgets on a single Page with as many Tabbed panels as you want. Add anything inside the panels to organize content on your blog layout and make it look more professional. The tabs supports nested shortcodes, so you can also add the jQuery accordion shortcode inside it to provide the best possible user interface to your BlogSpot readers.


How Shortcode Tabs UI works?

A Tab is a graphical control element that allows multiple panels to be contained within a single window, where switching between the documents inside the panels is done using the tabs as a navigation. All shortcodes are responsive and fluid, they will auto adjust to Mobile devices screen size.

You can also add FontAwesome icons next to tab headlines to make it more meaningful. You can also nest other shortcode objects inside the tabbed panel. The screenshot below shows a Soundcloud shortcode nested inside an accordion and the accordion itself is nested inside the Tabs Shortcode which it self is added inside a sidebar HTML/JavaScript widget.

accordion nested inside tabs

All this done with few sentences and not a code! Because a shortcode itself it not a code but a text which is processed as HTML. You can choose to add icons to tabs or not.

tab without icon

You can also add content inside tabs and embed it inside blogger threaded comments or classic comment form!

tabs inserted inside blog comments

Don't believe your eyes? Believe it! =)

Install Blogger Shortcode Plugin

First and foremost you need to install the Shortcode Plugin by following 7 easy steps shared on the tutorial link below

Add Tabs Shortcode To Blogger

1 Go To Blogger > Template > Backup your template 

2 Click Edit HTML

3 Search ]]></b:skin>

4 Paste the following CSS Styles just above it

/*-----Shortcode Tabs--------*/
.sc-tab ul.tabset.tabs li a.active{
border-bottom: 1px solid #70CF0A;
border-top: 3px solid #70CF0A;
padding: 8px 10px 10px 10px;
background: #70CF0A;
color: #fff;
border-left: 1px solid #70CF0A;
border-right: 1px solid #70CF0A;
}
.sc-tab ul.tabset.tabs li a:hover {
background: #70CF0A;
color: white;
border-color: #70CF0A;
}

.sc-tab ul.tabset.tabs {
margin: 0;
padding: 0;
list-style: none;
}
.sc-tab ul.tabset.tabs li {
float: left;
margin: 0px 4px 0px 0px;
border-right: 1px solid #EEE;
}
.sc-tab ul.tabset.tabs li a {
color: #666;
text-decoration: none;
    font-family: oswald, arial;font-size: 14px;
}
.sc-tab .tab-box {
clear: both;
position: relative;
z-index: 50;
top: 3px;
}
.sc-tab .tab_content {
display: none;
border: 1px solid #EEE;
padding: 1em;
border-bottom: 3px solid #70CF0A;
box-shadow: 2px 4px 6px #EEE;
font-family: arial;
font-size: 14px;
}
.sc-tab ul.tabset.tabs li a {
padding: 10px;
display: block;
border: 1px solid #EEE;
background: #fbfbfb;
position: relative;
z-index: 100;
}


  • To change its theme color replace #70CF0A with your preferred hexadecimal color. Use our Color Generator tool
  • To change The font type for tabs title replace oswald with your font name

6 Save your template and you are all done!

How to Create Responsive Tabs?

Creating Tabs using its shortcode is extremely easy. It follows almost a similar syntax as that of Accordion shortcode. You just need to paste the following shortcode where you want the Responsive Tabs to display:

Consider this code as TexT which you can insert anywhere like inside your blog posts, static pages, widgets and comments.

[tab]

[content title="Tab 1"] INSERT CONTENT HERE [/content]

[content title="Tab 2"] INSERT CONTENT HERE [/content]

[content title="Tab 3"] INSERT CONTENT HERE [/content]

[/tab]

Output:

tabs without icons

  • The above shortcode will create three tabs where [content marks the start of a new panel
  • You can insert any HTML, text or even a new shortcode inside the content area represented by  INSERT CONTENT HERE
  • Title of tab is changed by replacing the text Tab 1,2,3 etc.
  • To create a new tab and panel you just need to add the following sub-shortcode above [/tab]

[content title="Title Of Tab"]INSERT CONTENT HERE[/content]

Add Icons Next To Tabs

If you wish to add FontAwesome icons next to the tab title then you just need to add the attribute icon=" " as shown below

[tab]

[content title="Facebook" icon="fa-facebook"] INSERT CONTENT HERE [/content]

[content title="Google+" icon="fa-google-plus"] INSERT CONTENT HERE [/content]

[content title="Twitter" icon="fa-twitter"] INSERT CONTENT HERE [/content]

[/tab]

Output

tabs with icons

You just need to insert the Fontawesome icon name inside the icon attribute in this format

icon="fa-iconName"

For example to insert a Tag icon we will format the attribute as

icon="fa-tag"

That simple! Browse FontAwesome Icons to pick icon of your choice

Need Help?

In coming hours we will release more fresh shortcode tutorials. Make sure you stay updated by following all latest tutorials by subscribing to our free email updates. Let me know if you needed any help or assistance. You can now also suggest which Shortcode would you like us to create.

Stay healthy and take care of your loved ones. Peace and blessings buddies =>

Saturday 4 April 2015

jQuery Accordion Shortcode For Blogger!

Blogger Accordion ShortcodeEver wondered to create custom jQuery accordions with Toggle effect in blogger using a single line of code? That dream has come true thanks to Blogger Shortcode Plugin that we just published yesterday. You can now add multiple accordions not just on your sidebar widgets but also inside your post body and even inside your blog comments! You can give it any background colors and customize it to your needs. Treat it as a text which can be typed anywhere. Almost anywhere!

Lets first view a live demo of its UI to see how it works:


How Blogger Accordion UI works?

The UI of our Accordion contains a set of panels. All panel Tabs are visible at all times, but content inside the panels is hidden. When a user clicks the header of the panel, the body content of that panel will become visible and other panel's body contents which was previously visible will become invisible.

Blogger shortcode Accordion

For the first time in the history of both Wordpress blogs and Blogger, you can now  embed Accordions even inside Blog Comments. The accordion works with both classic and threaded blogger comments form. See the screenshot below

embed accordion inside comments

They can also be nested inside another Shortcode Object, take for instance the Multi tabs which we will release in a while. You can insert the accordion shortcode inside the Tabs widget to make it work!

accordion nested inside Tabs widget

Install Blogger Shortcode Plugin

First and foremost you need to install the Shortcode Plugin by following 7 easy steps shared on the tutorial link below

Add Accordion Shortcode To Blogger

1 Go To Blogger > Template > Backup your template 

2 Click Edit HTML

3 Search ]]></b:skin>

4 Paste the following CSS Styles just above it

/*------ Shortcode Accordion -----*/
.sc-accordion > h3 .anchor {
font-family: helvetica;
padding: 3px 7px;
color: #70CF0A;
margin: 0 8px 0 0;
}
.sc-accordion > h3 a {
text-decoration: none;
font: normal 16px oswald;
color: black;
border-bottom: 1px solid #eee;
display: block;
padding: 0 0 0.6em 0;
}
.sc-accordion .trigger {
border-bottom: 1px solid #DDD;
padding: 0 0 0.5em 0;
margin: 0 0 0.5em 0;
display: none;
    font-family: arial;
font-size: 14px;
}
.sc-accordion > h3.toggle {
margin: 0 0 0.5em;
}
.sc-accordion > h3 a.active {
border: none;
padding: 0;
}  
.sc-accordion > h3 a.active .anchor, .sc-accordion > h3 a.active {
color: #70CF0A;
}  
  .sc-accordion > h3 a:hover {
color: #70CF0A;
}


  • To change the color of font replace #70CF0A with your preferred hexadecimal color. Use our Color Generator tool
  • To change The font type replace oswald with your font name

6 Save your template and you are all done!

How to Create Accordion?

Now when you are done with all installation part. It is time to learn how to create toggle accordions and add them inside Posts, widgets and comments.

Creating accordion using its shortcode is extremely easy. You just need to paste the following shortcode where you want the accordion to display:


[accordion]

[item title="Title Of Tab 1"] INSERT CONTENT HERE [/item]

[item title="Title Of Tab 2"] INSERT CONTENT HERE [/item]

[item title="Title Of Tab 3"] INSERT CONTENT HERE [/item]

[/accordion]

Output:

image

  • The above shortcode will create three toggle tabs where [item marks the start of a new panel
  • You can insert any HTML, text or even a new shortcode inside the content area represented by  INSERT CONTENT HERE
  • You can place your headline or title by replacing the text Title Of Tab 1,2,3 etc.
  • To create a new tab and panel you just need to add the following sub-shortcode above [/accordion]

[item title="Title Of Tab"]INSERT CONTENT HERE[/item]

Need Help?

You can insert the shortcode anywhere inside your post composer, your template or even inside the TEXT widgets or HTML/JavaScript widgets.

Let me know if you needed any help. Peace and blessings buddies =>